Em domingo, 17 de maio de 2009 04:47:48 UTC-3, gab escreveu:
Managing documents in business processes
Managing documents in business processes
Published 11/05/2009
GXflow X's Upgrade 4 incorporated a functionality that allows you to manage documents within modeled business processes.
This scenario was taken into account when the document management functionalities were incorporated into GXflow. These functionalities include digital signatures. Digital signatures guarantee:
• Document author identification;
• That the author will not deny responsibility for the document;
• Easier full-text searches in document contents.
And from the perspective of business analysts, it allows them to define which documents will be involved in the process, which will be enabled for processing in each task, and what type of action will be allowed on each document (for example, in order to continue the process in some cases a new instance for a given document must be created, and other tasks instead may require that the user open the document to read it before being able to continue with the process).
Users have access at all times to the documents they are processing or have processed, that way they can know what the status of each document is. GXflow automatically controls document concurrence, preventing two users or more from overwriting their respective changes, and automatically storing the new versions of each document as they are modified.
----------------------------------------------------------
Document Manager
Through this application, a process administrator user can visualize all the documents that were created in the system.
The following figure shows the Documents Manager interface:
The following sections describe the different components making up this application.
Button Toolbar
- Read: This option allows to read the document.
- Rename: This option allows to rename the docuement.
- Check In: This option allows you to upload new document versions to the document repository of the workflow system.
For this action to be available, two conditions have to be met:
· The document type must have the Change action enabled in the task where the Work with Documents was executed.
· The user who wants to upload the new document version must have previously executed the Change Document action.
Once a user uploads a new version of a document to the repository, it is unlocked and it can be changed by other users.
- Check Out: This action downloads a copy of the last document version in the user PC, which will be used to perform the modification.
When a user executes this action on a document, the latter is locked for the exclusive use of the user that executed the Modify Document action. This implies that other users will not be enabled to modify the document until the modification is completed through the Check in action.
A document will have this action enabled only if the type of document it belongs to has the modification action enabled in the task where Work with Documents was executed.Undo Check Out: It allows to indo the check out action.
Remove: This option allows deleting documents from the documents repository of the workflow system. This means that every existing version of the documents will be physically deleted from the repository.
A document will have this action enabled only if the type of document it belongs to has the Delete action enabled in the task where Work with Documents is being executed.Documents Grid
Document Format: This column shows the format of each document through the icon identifying it.
Comments: This column will display the icon, which will allow the user to view the comments associated with the document.
Digital Signature: When a document has been digitally signed, this column gives access to a dialog with details of the digital signature and the certificate used to sign the document.
Locked: This column shows whether the document is locked by a user to modify it. Bear in mind that when a user executes the Modify action on a document, it will remain locked until the user completes the modification.
- Sort Ascending: It allows to sort the documents by the name of the column selected. From A to Z.
- Sort Descending: It allows to sort the documents by the name of the column selected. From Z to A.
- Columns: It allow to select the columns wanted to be visible.
- Id: Document Id
- Name: Document name
- Type: It shows the document type. Be careful not to confuse the type with the format. Formats may be Word, Excel or PDF, among other, while document types are exclusive for each workflow application.
- Author: User that was the author of a document. This column will always show the desktop user.
- Checkout Responsible: The user that check´s in the document.
- Group by this field: It allows to group de documents by the column selected
- Show in groups: It allows to group the documents by the column selected.
- Filters: It allows to filter the documents.
For an overview of GXflow client refer to the GXflow Client General Structure section.
Created by: mdupont last modification: 12/22/08 03:21 PM by mdupont
GXflow Client General Structure
The following subsections describe each one of the components indicated in the previous figure.
Logged User
It indicates the name of the user currently logged to the system.
Sign out
It allows to sign out the application in order to log on with another user.
Navigator
Through the Navigator, the user will be able to select with which of the applications integrating GXflow client he wants to work.
The options shown in this tree depend on the profile of the user currently logged to the system. Basically, there are three user profiles:
- Normal user: this is the typical workflow system user. Each one of these users will normally have a group of roles assigned that will allow him working with specific tasks of the workflow processes. They have the most constrained access level to the system and are not enabled to access any administration application.
- Process administrator user: in addition to have the same rights of the normal users, these users can access process administration applications. This implies that a user with this profile will be able to execute actions such as suspend or quit processes, assign tasks to users, etc.
- Administrator user: this is the profile with the highest access level and is aimed at system administrator users. These users will be enabled to access all GXflow client applications, which will allow them execute actions such as create new users, assign/remove roles to/from users and setup certain global options of the workflow system.
Profiles assignment to users is performed in the Users application of the Administration ConsoleThe following table shows in detail the different options in the navigator:
This application is available for all users and is where typical users work. In turn, it is made up by a group of applications that allow the user to visualize his list of pending tasks, execute a task, start new processes (if he has the corresponding rights), etc.
Desktop
The desktop consists of a group of applications that allow the user to interact with the tasks of the processes where he participates.
Among other things, the desktop allows the user to visualize the list of his pending tasks, to query information about each task and also to execute and complete tasks.
Every workflow system user can access the desktop and each user can personalize his desktop through a group of configurable preferences.
The desktop consists of the following applications:
For an overview of the GXflow client please refer to the following section: GXflow General Structure
This application is available for the users with processes administrator or administrator profile. In turn, it is made up by a group of applications that allow the user to query information about the different processes that were created in the system, suspend or quit processes, assign tasks to users manually, etc.
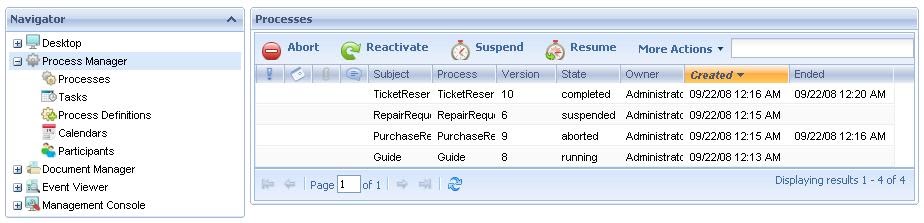
Process Manager
The Process Manager consists of applications aimed at process manager users.
These applications allow managing different processes, tasks and users participating in the processes, among other things.
The following figure shows this application interface:
The process manager consists of the following applications:
For an overview of GXflow client refer to the GXflow Client General Structure section.
Through this application, a process administrator user can visualize all the documents that were created in the system.
Document Manager
Through this application, a process administrator user can visualize all the documents that were created in the system.
The following figure shows the Documents Manager interface:
The following sections describe the different components making up this application.
Button Toolbar
- Read: This option allows to read the document.
- Rename: This option allows to rename the docuement.
- Check In: This option allows you to upload new document versions to the document repository of the workflow system.
For this action to be available, two conditions have to be met:
· The document type must have the Change action enabled in the task where the Work with Documents was executed.
· The user who wants to upload the new document version must have previously executed the Change Document action.
Once a user uploads a new version of a document to the repository, it is unlocked and it can be changed by other users.
- Check Out: This action downloads a copy of the last document version in the user PC, which will be used to perform the modification.
When a user executes this action on a document, the latter is locked for the exclusive use of the user that executed the Modify Document action. This implies that other users will not be enabled to modify the document until the modification is completed through the Check in action.
A document will have this action enabled only if the type of document it belongs to has the modification action enabled in the task where Work with Documents was executed.Undo Check Out: It allows to indo the check out action.
Remove: This option allows deleting documents from the documents repository of the workflow system. This means that every existing version of the documents will be physically deleted from the repository.
A document will have this action enabled only if the type of document it belongs to has the Delete action enabled in the task where Work with Documents is being executed.Documents Grid
- Sort Ascending: It allows to sort the documents by the name of the column selected. From A to Z.
- Sort Descending: It allows to sort the documents by the name of the column selected. From Z to A.
- Columns: It allow to select the columns wanted to be visible.
- Id: Document Id
- Name: Document name
- Type: It shows the document type. Be careful not to confuse the type with the format. Formats may be Word, Excel or PDF, among other, while document types are exclusive for each workflow application.
- Author: User that was the author of a document. This column will always show the desktop user.
- Checkout Responsible: The user that check´s in the document.
- Group by this field: It allows to group de documents by the column selected
- Show in groups: It allows to group the documents by the column selected.
- Filters: It allows to filter the documents.
This application is available for users with process administrator or administrator profile. It allows the user to query information about the different events that took place in the system. This events are significant for the workflow system, such as the creation of a process, the creation of a task, the assignment of a task to a user, etc.
Event Viewer
Through the Event Viewer, administrator users can visualize the events occurring in the workflow system and obtain specific information of each one of them.
The following figure shows the Events Viewer interface:
The following sections describe the different components making up this application.
Button Toolbar
- Details: It shows a dialog with event details:
- Target: This is the object affected by the event. E.g.: it can be a new document, a new task, an application data, etc.
A link for some objects is enabled in this column that allows accessing a dialog containing specific information on the object.
In case the object is a task or process, the link will access the process history.Event Grid
The event grid shows the different events that occurred in the system. By default, only those events occurring in the current date will be shown.
- Sort Ascending: It allows to sort the events by the name of the column selected. From A to Z.
- Sort Descending: It allows to sort the events by the name of the column selected. From Z to A.
- Columns: It allow to select the columns wanted to be visible.
- Id: Event Id
- Type: Type of the event that occurred. It may be one of the following:
- New Instance: a new process or task was created
- Change of Data: change of the value of an application data
- Change of Status: change of the status of a process or task
- Change of Priority: change of the priority of a process or task
- Change of Assignment: change of the assignment of a task
- Warning: warning because a process or task is about to expire
- Deadline: deadline of a process or task. It indicates that the process or task has expired.
- Error: an error occurred, such as that a user typed his user or password wrongly on attempting to log into the system.
- Unsatisfied condition: the evaluation of a condition produced an invalid result.
- Unavailable resource: there are no resources (users) available to process the task.
- External Event: an event external to the Workflow system occurred.
- Source: GXflow client application where the event occurred.
- Target: This is the object affected by the event. E.g.: it can be a new document, a new task, an application data, etc.
A link for some objects is enabled in this column that allows accessing a dialog containing specific information on the object.
In case the object is a task or process, the link will access the process history.- User: User that caused the event (if applicable).
- Group by this field: It allows to group de events by the column selected
- Show in groups: It allows to group the events by the column selected.
- Filters: It allows to filter the events.
For an overview of GXflow client refer to the GXflow Client General Structure section.
This application is available only for those users that have administrator profile. It allows creating new users, assigning roles to users, setting up global options of the workflow system, etc.
Management Console
Users, roles, roles associated to users, restrictions and global preferences of the system are managed from this Management Console. Only the users with administrator profile can access this application.
The following figure shows this application interface:
The Management Console consists of the following applications:
For an overview of GXflow client refer to the GXflow Client General Structure section.
Settings
Refresh
It allows you to refresh the grid.
Current Application
Under the section where the currently logged user is shown, the application the user is working on is also shown. This is the application currently selected in the Navigator.
In turn, each one of these applications is made up by a group of applications that are shown as tabs. The user will be able to access any of these applications, any time, by clicking on the corresponding tree item.Most of the applications making up GXflow client present interfaces very similar to each other.
This section describes the common elements shared by these applications.
- Grid
- Search
- Multiple Process
- Paging Buttons
All applications that present information through a grid have a group of buttons that allow browsing over the grid pages. These buttons are always shown at the bottom of the grid.
It allows you to move to first page, to previous page, to following page, to last page or type the number of the page wanted.
Created by: mdupont last modification: 01/13/09 03:49 PM by lsilveira


")


Has recibido este mensaje porque estás suscrito al grupo "GeneXus" de Grupos de Google.
Para cancelar la suscripción a este grupo y dejar de recibir sus mensajes, envía un correo electrónico a genexus+unsubscribe@googlegroups.com.
Para acceder a más opciones, visita https://groups.google.com/d/optout.
